If you have been following my blog, you will know that I am slightly obsessed with the Flour cookbook. Every time I flip through the book, I pass the croissant recipe. I always think "if only..." and promise myself that one day, when I have plenty (and I mean plenty) of free time, I will try to make them. However, shamefully, I always get scared by the three dense pages of directions that follow the picture of Joanne's fluffy, buttery croissants.
I had a sudden burst of courage last week though - and a special occasion: mom's ___th birthday! This was my chance to brave the loooong (but oh so well explained) directions and procedure of croissant-making.
My croissants came out beautifully - so much better than I expected (especially since Joanne wrote at the end of the recipe that our first attempt would likely be a flop...except she wrote this more subtly and eloquently). The biggest issue when making croissants is the timing. There are several steps, each separated by various-length time intervals of chilling in the fridge. I wish I had timed myself differently because I think I could have gotten an even fluffier result if I had. Between the second to last and the last steps, there is an option to halt the process in the fridge overnight rather than allowing the croissants to finish proofing and baking them immediately. Because I wanted to serve these as a birthday breakfast, I opted for the fridge-route. However, my croissants deflated slightly in the fridge overnight, much to my dismay. I was nervous they wouldn't puff up at all in the oven the next day, but luckily they did. Nevertheless, I am convinced that if I hadn't gone the fridge-route, I would have had an even more amazing result. Oh well...I guess I'll just have to make them again...
These croissants are delicious alone or with a touch of jam - I made Giada's blackberry basil jam to go along with them! I also ate a croissant with a more savory lunch the next day - some beets, beet greens, goat cheese, and walnuts - and it was heavenly.
The great thing is that these croissants can be kept in an airtight containers and reheated/refreshed in the oven for the few days following their initial baking. The reheated results isn't as good as the fresh product, but it's very close! I even froze a croissant to see what the result would be (because this recipe makes a good, large 12 croissants...if I ate them all, I'd go into a butter coma!), but I haven't defrosted it yet, so I cannot report on the success/failure right now...hmm maybe a yummy lunch for today, come to think of it!
So I followed the Flour cookbook croissant recipe very very closely. I studied the directions religiously! It's too much to write the full recipe on my blog, but I will show pictures of all the steps with a few comments. I highly recommend you go to your local library and rent the book (or bookstore and buy it...very worth it)!
 |
| First step: make the dough. |
 |
| After relaxing in the fridge for a bit. |
 |
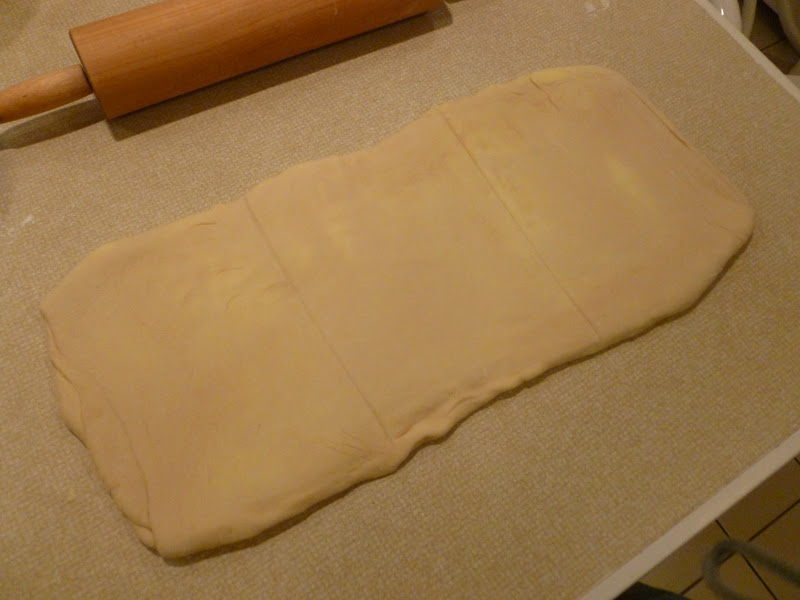
| Roll out the dough into a square and mark four lines. |
 |
| Roll out the flaps (initially triangular) into squares. |
 |
| Break up the butter quickly in the KitchenAid and then spread it onto the center square. |
 |
| Flap un. Stretchhh! |
 |
| Flap deux. |
 |
| Flap trois. |
 |
| Flap quatre. Fin. |
 |
| And then rollll into a rectangle. |
 |
| Right side to the center line. |
 |
| Left side to the center line. |
 |
| Right over left. |
 |
| And then roll it out again. Time for the letter fold. |
 |
| Right over middle. |
 |
| Left over middle. |
 |
| Into the fridge for some waiting. |
 |
| Out of the fridge. Time to roll again. |
 |
| Another letter fold. |
 |
| Right over middle. |
 |
| Left over middle. |
 |
| Back to the fridge! |
 |
| Out of the fridge (again). |
 |
| The ultimate rollllll. Glad the table was just long enough...should have measured it first just in case. |
 |
| Slice into triangles. The Flour cookbook doesn't say to use the ugly end bits, but have no fear, I rolled them up just like their fellow nicely cut pieces...maybe not as pretty but just as delicious! |
 |
| Little slits. |
 |
| All ready for some stretching and rolling. |
 |
| Firm but light grasp. |
 |
| Stretch!! |
 |
| Spread the top "Y" part. |
 |
| Let the rollin' begin. This is the best part. |
 |
| Right to the end. |
 |
| Seam side down. |
 |
| First proof in a warm, cozy spot. |
 |
| Look at how pillowy! |
 |
| First egg wash. |
 |
| Puffy little puffies. |
 |
| Here's where I halted the proofing process overnight in the fridge. |
 |
| See, slightly deflated the next morning. |
 |
| Second proof. Then second egg wash. Then cooking time. |
 |
| Mmm golden and delicious. The house smelled like butter for two days! |
 |
| Glamour shot. |
 |
| A perfect birthday breakfast, complete with both kitties. |
 |
| Sassy was my croissant-guard-cat as I made the coffee. |
 |
| Oooh look at that. |
 |
| Crispy outside, fluffy inside and oh so decadently buttery. |
 |
| So airy inside! |
 |
| Mmm and the rest is history... |
These croissants definitely took a lot of time...extremely labor intensive...but if you can spare the time, it is so worth it! Never thought I could do it, but thanks to the excellent directions in the Flour cookbook, some courage, and some patience, I did!
What will my next challenge be? Suggestions welcome!


Very impressively detailed post. They were delicious. I had mine as egg sandwiches. The butteryness was perfect with some scrambled eggs. B had his plain.
ReplyDelete